
How to Sew a Tote Bag Using Half a Metre of Fabric!
Yup, one of the most useful and simple makes to start you stitching. We are going to go with a zero waste design to make a handy tote, with no raw edges.
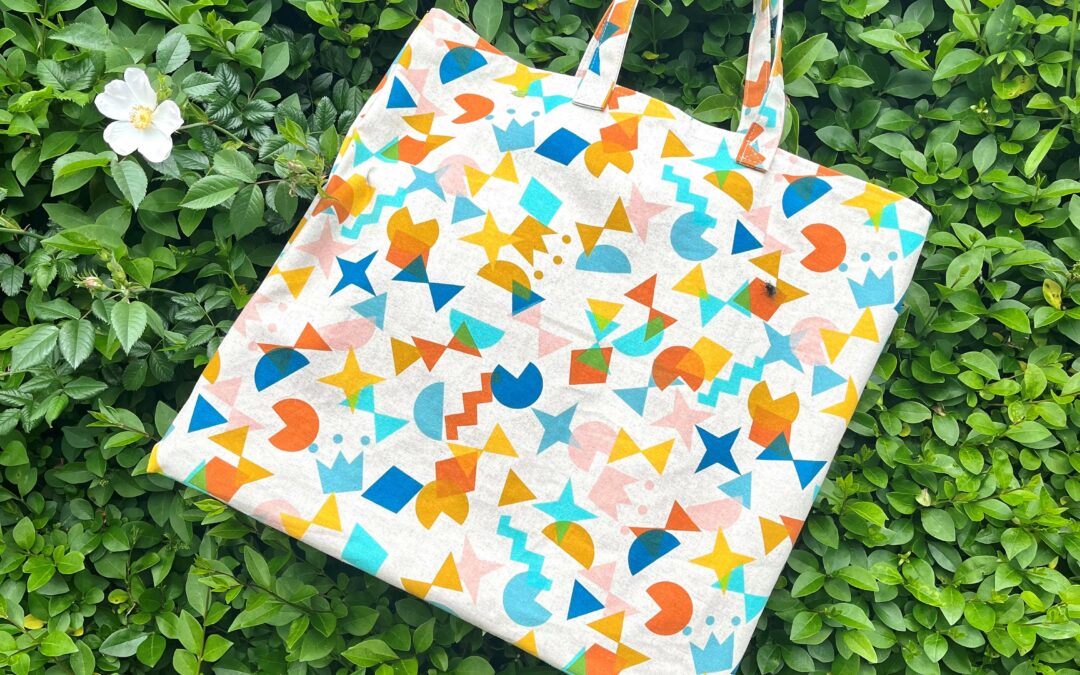
The Fabric
I’ve decided to use a canvas print for my tote. The fabric is a cotton/linen mix and is easy to sew and wont require any interfacing. If you choose a lighter weight fabric, such as quilting cotton, I’d recommend lining it and possibly adding some interfacing. It depends how much structure you’d like it to have, there’s no right or wrong!
My fabric is from the Papercuts collection from Cotton and Steel and is 44inches or around 112cm wide off the bolt. I’ve cut half a metre, as straight as possible so my piece is 55x112cm.
The fabric, and other canvases, is still available at the link below.
https://www.thetartanreel.co.uk/canvas
First Thing’s First
Press. The. Damn. Fabric.
Always.
The majority of issues in sewing come from inaccurate cutting or rushed prep. Always press your fabric! This will be a recurring theme. I bloody hate ironing clothes, but my iron is always on when sewing. I press at every step.
When you’re happy your fabric is nice and crease free, press it back in half to measure approx 50 x 55cm square. The bottom edge of the tote will be this folded edge.
If, however, you are using a fabric that has a directional print that will go the wrong way with the fold here, then just snip along this fold.
Trim the selvedge edges off. These vary in width slightly and can be anything from 1cm up to about 3cm deep. You just need to get rid of the fuzzy stuff to have a neat edge, no further as this edge will be enclosed in the handle.
Machine Setup and Thread
I wouldn’t recommend hand stitching a tote. Generally, machine stitching is stronger than hand stitching and for anything that takes some load (dressmakers and bagmakers, I’m looking at you), I’d opt for the machine.
Your thread choice is also important. Whilst cotton is a lovely natural fibre, it is not a strong thread. Keep this for your quilting. I only use polyester thread for bag making as it is significantly stronger, smoother and just less troublesome to work with. My preferred brand is Gutermann Sew-All and we stock every shade, including the recycled polyester threads.

rPET 20 Thread Collection
Stitch length is something I debate about a lot. If you assume more stitches, so a shorter stitch length, is stronger, please try and up your stitch length. The more you pierce the fabric, the weaker you are making it. I opt for a stitch length of 3 on seams and up to 3.5 for top stitching. Longer stitches on top-stitching will look tidier and be more forgiving of any wobbles.
Finally, pick a sewing machine needle that suits the weight of fabric you’ve picked. You need a sharp for woven fabrics, I’m using a 90 or 100 for this tote, as the handles get a wee bit thick. If you don’t have this type of needle and only have a 60 to 70, just take it easier. Slow is just fine.
Cutting and Prepping the Handles
To create the pieces of fabric for the handles, cut a 4inch or 10cm wide strip through both layers of fabric at the opposite edge to your fold, as show below.

How to Sew a Tote Bag – Fabric Layout
You should have two piece of fabric 10 x 50cm or 4 x 20 inches.
Press the short ends of each piece over to the wrong side by about 1cm. We are now going to press these to some skinnier strips. The goal is to reduce the width to 1 inch or 2.5cm, but no effect on the length. This is the image on the left, below.
Begin by pressing the handles, wrong sides together, in half with the long edges touching. Unfold and now press both long edges into this centre line. See the middle and right hand images.

How to Sew a Tote Bag – Handle Pressing
Finish by pressing back in half. Should now have a sturdy feeling handle, with no raw edges exposed.
Stitching Time!
Top Stitch the Handles
Take your two lovely straps and top stitch down both long edges, on each, about 3mm from the edge. If your machine doesn’t like taking 4 layers of thickness, come in a little more from the edge and go slow.

How to Sew a Tote Bag – Finished Handles
Prepare the Top Edge of the Tote
If you’ve kept the fold, fold the two edges parallel to it over and over again by around 1cm. Your raw edge should be tucked away. The amount you fold over by isn’t critical, it is just better to be consistent. It will only slightly alter finished dimensions. (If you have directional fabric, apply this same process to the top edge of each piece.)
Press with vigour!
Top stitch across these two edges, to keep the fold in place.
French Seam it Up!
French seams are a great way to finish your seams without the need for an overlocker of using a zig-zag stitch, to prevent fraying. French seams fully enclose the raw edge within the seam and are super easy to do.
To do the first step of your French seam, fold your fabric wrong sides together so that the top edges line up. Stitch down the two side edges, through both layers, using a quarter inch seam allowance.

How to Sew a Tote Bag – French Seam Stage 1
Turn the bag insides out and press. You are now going to stitch these sides again, now right sides together, using a 3/8 inch seam allowance. This completely encloses the first seam’s raw edges, without trimming.

How to Sew a Tote Bag – French Seam Part Deux
Attaching the Handles
If you’re the sort of person to overload your bags, then the stitching of the handles to the main tote is business critical! This is the strain point. A single line of top stitching is not going to cut it.
Handle placement is entirely your choice. I marked the centre of the tote by folding it in half and pinning the crease. Just measure out from here to place your handles, or do it by eye. You are the only person that will be looking at it critically, unless you know some horrid people, so as long as you are happy, that’s a win.
When you pin your handles on, just double check they aren’t twisted.
I was going to mock up a wee diagram for this, but my artistic skills are poor, so here is a closeup shot of how to stitch the handles down. You will end up going over one of the lines twice, but that’s ok. Start on the outside box, go round the outside then stitch your “X”.

How to Sew a Tote Bag – Handle X
How to upgrade your tote
I’m writing another blog post on this, and will link below when it is available. But, it is easy to upgrade your tote to have a flat bottom by creating boxed corners. It is also simple to add a zipped closure at the top, to add some security.

How to Sew a Tote Bag – The Final Bag
I’d love to see if you tackle stitching your own tote bag.
Happy stitching,
Janey